In this article, you will learn what Prometheus, Alert Manager, Prometheus Exporters, and Grafana is, and how to install and configure them on Linux servers.
We’ll install and configure Prometheus, Alert Manager, Node Exporter, and Grafana and make them production-ready by running them as systemd service on Linux.
You will learn how to configure Alert Manager to receive alerts and how to connect Grafana with Prometheus and create dashboards using Prometheus data.
What is Prometheus?
In the software world, Prometheus is an open-source monitoring system. It was originally developed at SoundCloud in 2012 and later made available to the public as free open-source software.
Prometheus functions by collecting data from configured targets at specified intervals. It stores all gathered data in its time-series database.
The time-series database can be queried using Prometheus Query Language (PromQL), a powerful tool that enables you to search through loads of data stored in the Prometheus database.

What are the Metrics in Prometheus?
A metric in Prometheus is a number that captures the value of something at a certain point in time.
Suppose you want to keep track of the total number of HTTP requests to your web server every minute. To do this, you can set up a metric, for example, http_requests_total. In this case, Prometheus talks to your web server every minute and updates the metric with the new value in the database. Prometheus stores these values in the database along with the time it was retrieved from the target.
For example, on January 3, 2024, at 4:00 PM, your web server has handled 1000 requests in total. Since Prometheus is set to collect data every minute, it will check in again at 4:01 PM and update the metric with the new total number of requests.
Metrics in Prometheus can optionally include labels. These labels are key-value pairs that provide additional details about the metric. For instance, a label might be used to indicate the number of requests that resulted in a 200 OK response.
http_requests_total{status_code="200"} 1027What is time-series data in Prometheus?
Prometheus stores its metrics in a time-series database. What does that mean?
In simple terms, time-series data refers to the type of data that has a timestamp on it. It’s the timestamp that makes the value of a metric meaningful. For instance, without a timestamp, the total number of requests to your web server is less valuable.
Let’s see another example. Say you want to record your server room temperature every hour to make sure it’s not overheated. Here is a time-series data representing the server room temperature.
Timestamp               | Temperature (°C)
-----------------------------------------
2024-01-03 08:00:00     | 20
2024-01-03 09:00:00     | 21
2024-01-03 10:00:00     | 20
2024-01-03 11:00:00     | 22
2024-01-03 12:00:00     | 23
2024-01-03 13:00:00     | 23
2024-01-03 14:00:00     | 24
2024-01-03 15:00:00     | 24
2024-01-03 16:00:00     | 23
What makes Prometheus powerful?
One of the common uses of Prometheus is to collect metrics from a dynamic, short-lived, and always-changing environment like Docker or Kubernetes.
In a containerized environment like Kubernetes, a container can born and die at any time. For example, if the service load increases, new containers will be created automatically by auto scalers.
With traditional monitoring tools like Nagios, you would need to register these new containers in your configuration before you receive any data from them, which is not possible in a micro-services environment.
Prometheus is popular for monitoring such dynamic environments thanks to its powerful Service Discovery feature that can automatically find targets and collect metrics from them.
Besides Service Discovery, it has a set of other powerful features like Alert Manager for alerting and sending alerts to different systems, its PromQL query language to query data, its reliability as it does not depend on any external system, its flexibility like flexible scrape intervals, and more.
Installing and Configuring Prometheus Server on Linux
In this section, we will download, install, configure, and run Prometheus Server as systemd service.
How to install Prometheus on Linux?
Step 1: SSH to the server you want to install Prometheus
The first step is to download the latest version of Prometheus. You can always see the latest versions at https://prometheus.io/download/.
Before downloading, check your system architecture and download the right binary file. To check your server system architecture, run the uname command:
uname -m
After figuring out the correct arch type of your server, you can right click and copy the link address and download the file using cURL like the following:
curl -O https://github.com/prometheus/prometheus/releases/download/v2.48.0-rc.2/prometheus-2.48.0-rc.2.linux-arm64.tar.gzStep 2: Extract the contents of the downloaded file
We can extract the tarball file to a desired directory. In a Linux system, the binary executables of applications like Prometheus are stored in executable paths like /opt or /usr/local/. I want to extract the tarball file to /opt/prometheus. But first, let’s create that directory:
sudo mkdir /opt/prometheusIn the directory which you downloaded the file, run the following tar command to extract the gzip file content to /opt/prometheus directory we just created.
sudo tar -xzf prometheus-*.tar.gz --strip-components=1 -C /opt/prometheusThe —strip-components option tells tar to remove the first directory level from each file path in the tarball.
The -C option tells tar where to extract the contents of the tar.

You can test the Prometheus binary executable by seeing it’s help menu:
/opt/prometheus/prometheus --helpYou should see the help output.
How to Configure the Prometheus Server
The Prometheus configuration file is in YAML format, which makes it easier to read and work with.
The Prometheus tarball file we downloaded earlier has a sample prometheus.yml file. For us, the file is under /opt/prometheus as we extracted the tarball on that directory.
You can copy the following configuration to prometheus.yml file, or just use the sample configuration file provided.
I have just removed comments and removed other components for now to make it simpler.
global:
	scrape_interval: 15s

scrape_configs:
  - job_name: "prometheus"

    static_configs:
      - targets: ["localhost:9090"]
Let’s break down this simple configuration.
**global**: This block contains global configuration options for Prometheus.
s**crape_interval: 15s** This setting specifies how frequently Prometheus should "scrape" (collect) metrics from the targets. In this case, it's set to every 15 seconds. If a target has its scrape interval configured inscrape_configs, that interval will override this global setting.
scrape_configs: This section contains one or more configurations that define a set of targets and parameters describing how to collect (scrape) metrics from those targets.
- job_name: "prometheus": This is a job definition underscrape_configs. Each job has a name, in this case, "prometheus". A job groups together a set of targets (endpoints) with the same scraping needs (like the same scrape interval, authentication credentials, etc.).static_configs:: This section defines a list of static targets for Prometheus to scrape. Static configs are where you explicitly specify target addresses. It's one of the methods to specify targets, the other being service discovery.targets: ["localhost:9090"]: Under static configs, you define the actual targets to be scraped. Here, Prometheus is configured to scrape metrics from itself (since it's running onlocalhostand the default port for Prometheus is9090). This is a common setup for monitoring the Prometheus server itself.
How to Start the Prometheus Server
To start the Prometheus server with the configuration we just edit, run:
./prometheus --config.file=prometheus.yml
This will run Prometheus and start an HTTP server on port 9090. Make sure port 9090 is allowed in your firewall. If using firewalld, you can enable it by running the following firewall-cmd commands:
sudo firewall-cmd --permanent --add-port=9090/tcp
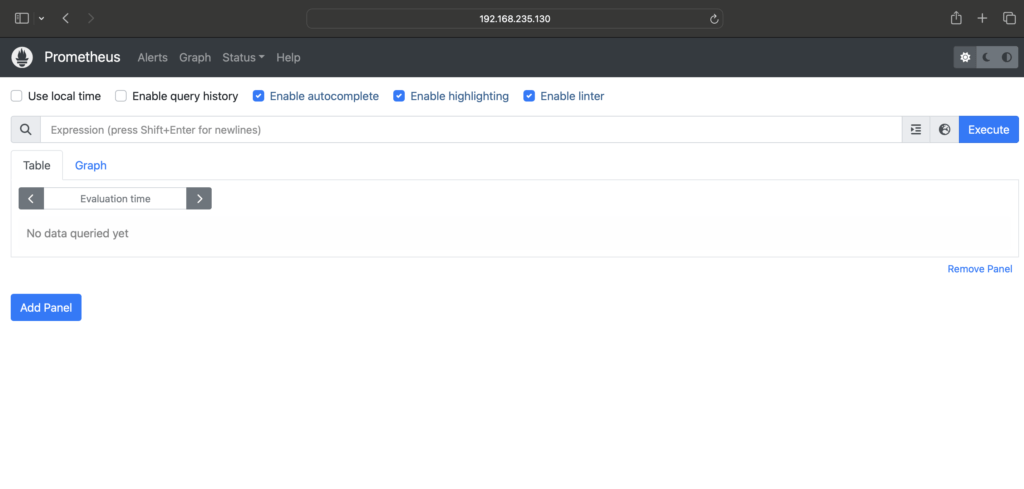
sudo firewall-cmd --reloadTo access Prometheus, get the Prometheus Server IP address, open a browser and visit http://prometheus-server-ip:9090
If you’re executing the binary files on your local machine, you can use localhost.
I’m running it on a VM with IP address 192.168.235.130, and I access the Prometheus server with http://192.168.235.130:9090/ on the browser:
How to Configure Prometheus to run as a systemd service
In the previous step, we executed the Prometheus binary from the terminal. That means, if we exit the terminal or the server, the execution will stop. We can run the service in the background too but because we will be dealing with managing this service often, it makes sense to run it as systemd service.
We need to configure systemd to manage running prometheus as a server so we can manage it with systemctl and configure it to automatically start at boot.
Create a file /etc/systemd/system/prometheus.service and open it with your favorite editor:
sudo vi /etc/systemd/system/prometheus.servicePaste the following content to /etc/systemd/system/prometheus.service:
[Unit]
Description=Prometheus Monitoring
Wants=network-online.target
After=network-online.target

[Service]
User=prometheus
Group=prometheus
Type=simple
ExecStart=/opt/prometheus/prometheus \\
  --config.file=/opt/prometheus/prometheus.yml \\
  --storage.tsdb.path=/opt/prometheus/data \\
  --web.console.templates=/opt/prometheus/consoles \\
  --web.console.libraries=/opt/prometheus/console_libraries

[Install]
WantedBy=multi-user.target
Under the [Service] directive, we specified the user, group, and command (ExecStart) to run Prometheus.
We also passed —storage.tsdb.path to specify the time-series database directory, --web.console.templates & --web.console.libraries for the web console. These options make sure Prometheus finds the files.
As specified in the configuration file, the service should be running with prometheus user. We have to create the prometheus user to run this service:
sudo useradd prometheus
That will create a user and group called prometheus.
Next, we need to change the /opt/prometheus ownership to this user:
sudo chown -R prometheus:prometheus /opt/prometheus
We are ready to start the Prometheus service.
First, we need to reload the systemd daemon so it’s aware of our new systemd configuration file for Prometheus:
sudo systemctl daemon-reload
We can enable Prometheus to start automatically whenever the server starts or reboots.
sudo systemctl enable prometheus
To start the Prometheus server, run:
sudo systemctl start prometheus
Check the status of the service:
sudo systemctl status prometheus
The service should be enabled, active, and running.

If you see errors, you can check journalctl logs to troubleshoot:
journalctl -u prometheus --no-pagerAccess the Prometheus server from your browser and make sure it’s accessible.
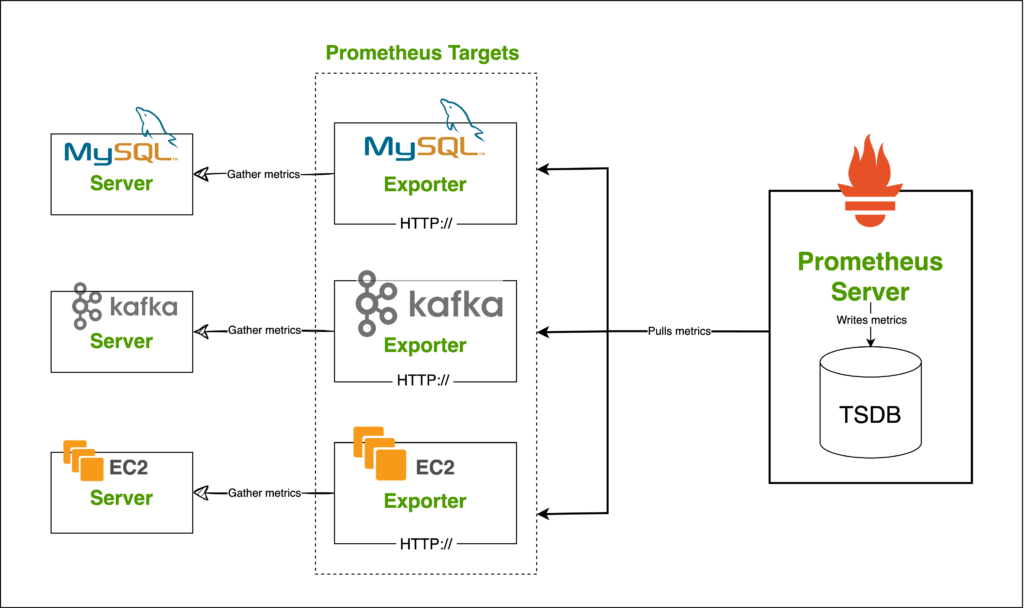
What are Prometheus Exporters
Prometheus Exporters work alongside an application such as MySQL or Kafka and interact with the application to gather metrics and make them available to the Prometheus Server.
For example, suppose you have an Apache server and you want to monitor it with Prometheus. In that case, there is the Apache Exporter that you can install on the server running Apache or on a separate server. The Apache Exporter will expose Apache metrics to Prometheus for collection.
You can then add that Exporter as a target to Prometheus and all its metrics will be available in the Prometheus server for querying.
There are Exporters for different technologies such as MySQL Exporter to monitor MySQL performance, Node Exporter to monitor a server’s resource usage, Kafka Exporter, and so on.
You can see a list of available Exporters here.
If you want to monitor a unique application that does not have an Exporter available on the internet, you can write your own Prometheus Exporter using your favorite programming language.
For building your own Prometheus exporter in Python, see Building Your Own Prometheus Exporter in Python.
Some applications could natively expose metrics compatible with Prometheus. This is more common in the ecosystem of tools around Kubernetes, where Prometheus is a popular choice for monitoring.
How to install and configure a Node Exporter in Prometheus
A Node Exporter exposes metrics about a node/machine. For example, the CPU and Memory utilization of a server.
Let’s install Node Exporter on the same node as we installed Prometheus to expose node metrics.
Node Exporter can be installed on any node you wish to monitor. In this case, I want to install it on the same node as the Prometheus server but it could be any other node.
Follow the below steps to install Node Exporter:
Step 1 - Download and install Node Exporter
Go to the Node Exporter download page and copy the download link for your desired OS. For this guide, I am installing it on a Linux i.e. Prometheus Server itself.
If you wish to monitor a Windows node, you can download and install the package for Windows operating systems.
At the time of writing this document, the Node Exporter version on their download page is v1.7.0:
curl -LO https://github.com/prometheus/node_exporter/releases/download/v1.7.0/node_exporter-1.7.0.linux-arm64.tar.gzNow that the file is downloaded, let’s move it to a proper location. We copied Prometheus binaries to /opt on our server, let’s move Node Exporter to the same location.
Make a directory:
sudo mkdir /opt/node_exporter
After that, extract the tarball file to the directory we just created.
sudo tar -xzf node_exporter-*.tar.gz --strip-components=1 -C /opt/node_exporter
Check the contents of the /opt/node_exporter directory to make sure the node_exporter binary is present.

Step 2 - Run the node exporter
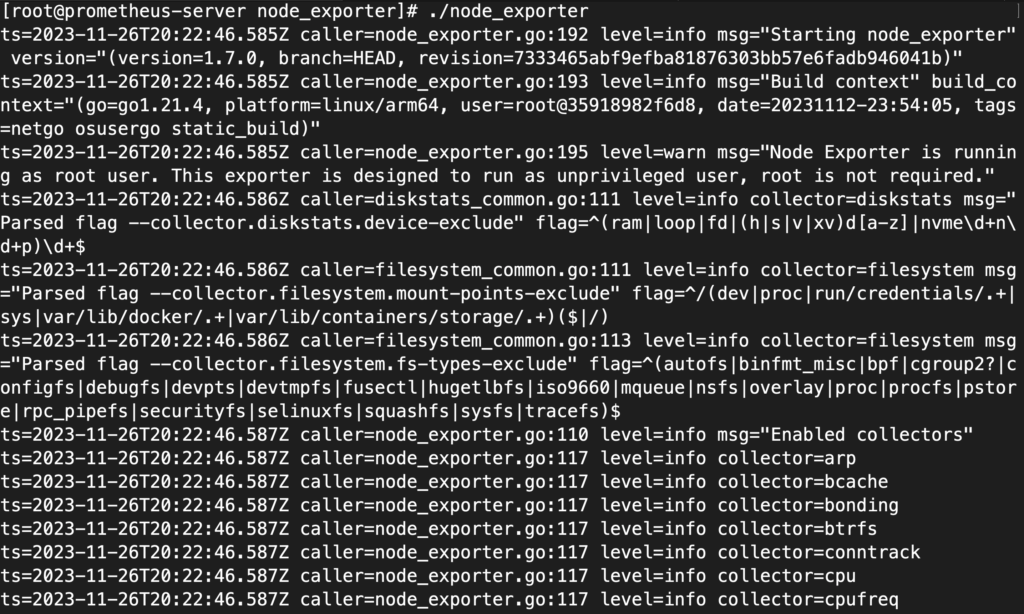
We can run the node_exporter binary like a normal script:
cd /opt/node_exporter
./node_exporter
This will run the Node Exporter binary and expose the node metrics on port 9100 by default.
Step 3 - Open Node Exporter Port on Firewall
To allow Prometheus to collect metrics from the Node Exporter you should open the Node Exporter port (default 9100) on the firewall. If you're using firewalld, the command is:
firewall-cmd --permanent --add-port=9100/tcp
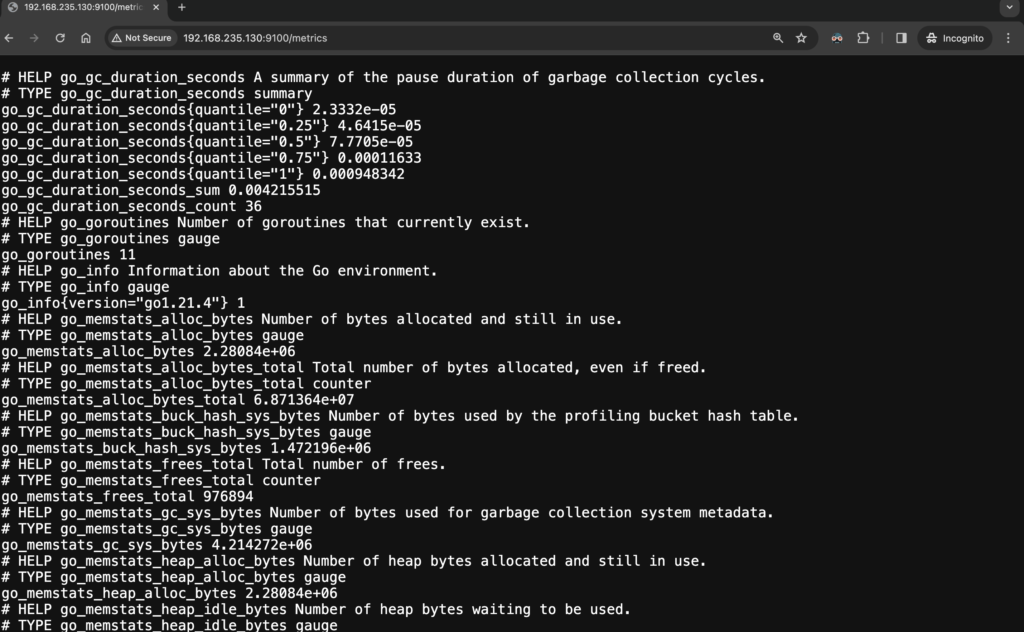
firewall-cmd --reloadTo make sure Node Exporter is available, you can use cURL command from Prometheus server:
curl http://<hostname or ip>:9100/metricsYou can also open a browser and access the Node Exporter on the browser. You should be able to see host-related metrics.
Step 3 - Run Node Exporter as a systemd service
The steps are the same as how we ran Prometheus itself as a systemd service.
Create a systemd file: /etc/systemd/system/node_exporter.service with the following content:
[Unit]
Description=Node Exporter
Wants=network-online.target
After=network-online.target

[Service]
User=prometheus
Group=prometheus
Type=simple
ExecStart=/opt/node_exporter/node_exporter

[Install]
WantedBy=multi-user.target
If you look at the ExecStart option, we are simply running the node_exporter binary without passing any option.
After adding the file, reload the systemd daemon:
sudo systemctl daemon-reloadEnable the newly created node_exporter service so it can start automatically at boot:
sudo systemctl enable node_exporterStart the node_exporter service:
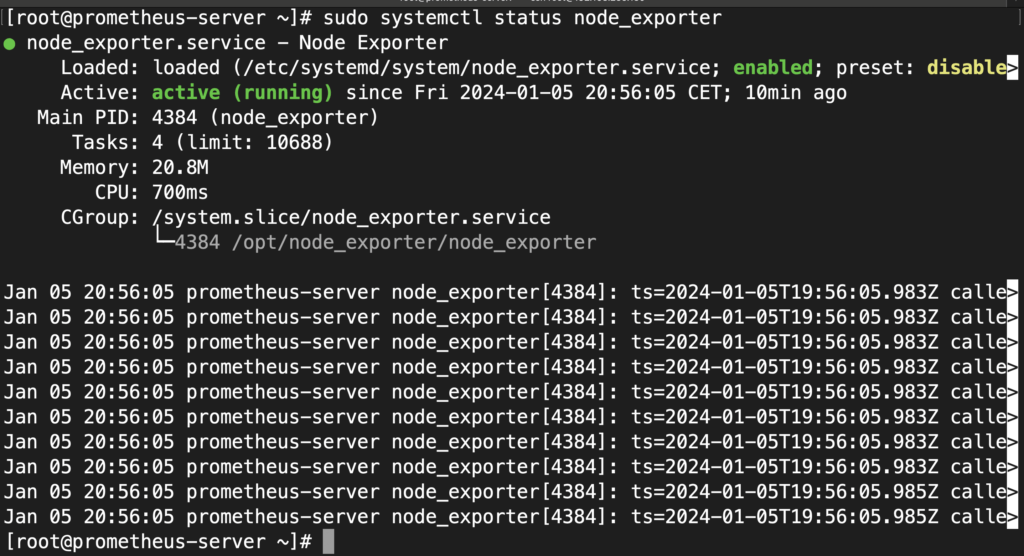
sudo systemctl start node_exporterCheck the status of node_exporter and make sure it is in the “running” state:
sudo systemctl status node_exporterOutput:
Registering Prometheus Targets
Prometheus can be configured to monitor both static and dynamic targets.
Static targets: are stable applications like an HTTP service or monitoring a node’s resource consumption.
Dynamic targets: are short-lived environments that cannot be registered in advance as we don’t know much about them. Prometheus’s Service Discovery will help us discover those short-lived resources and add them as targets.
Registering static targets in Prometheus
Prometheus targets are defined in prometheus.yml configuration. If you have followed along, we have already seen the example of this in our sample prometheus.yml configuration file.
...
scrape_configs:
  - job_name: "prometheus"

    static_configs:
      - targets: ["localhost:9090"]
In that snippet, we have defined a static target under static_configs section. The target is the host that runs Prometheus, on port 9090, which is the Prometheus server itself.
The job_name option can group multiple targets that have similar configurations. For example, you could bring web servers with similar configurations under a job name e.g. “web-servers”.
To register static targets, follow these steps:
Step 1 - Figure Out The Target
The first step in registering a target in Prometheus is knowing what you need to monitor. There are dozens of ready-to-use Prometheus Exporter that you can deploy and start monitoring.
We configured Node Exporter on the same node as the Prometheus server. Let’s add that as a target to Prometheus so it can collect metrics from it.
The Node Exporter we configured in the previous section exposes node-related metrics on port 9100, therefore, our target is the Prometheus Server itself on port 9100, thus:
localhost:9100If we want to monitor another node for instance, you first install node exporter on that node and then you’d have that node’s IP or hostname instead of localhost. Because the Node Exporter is running on the same node as Prometheus, we just use localhost.
Step 2 - How to Add a Target to Prometheus
To add this Node Exporter to the list of targets, you can define a job with a name i.e “nodes” for example. Remember job_name is just a group that can bring multiple targets under the same settings.
Adding the new target, our configuration will look like the following:
...
scrape_configs:
  - job_name: "prometheus"

    static_configs:
      - targets: ["localhost:9090"]

  - job_name: "nodes"

    static_configs:
      - targets: ["localhost:9100"]
Here we have two targets, the Prometheus server itself (localhost:9090 ) and the Node Exporter (localhost:9100) which exposes the host metrics on port 9100.
At this point, the full prometheus.yml file is as follows:
global:
  scrape_interval: 15s

scrape_configs:
  - job_name: "prometheus"

    static_configs:
      - targets: ["localhost:9090"]

  - job_name: "nodes"

    static_configs:
      - targets: ["localhost:9100"]
Step 3 - Reload Prometheus Server
We configured systemd service earlier for Prometheus which we can now restart using systemctl.
sudo systemctl restart prometheus
To reload the configuration file in Prometheus without restarting the server, you can send a SIGHUP signal to the Prometheus process or use an HTTP POST request to the /-/reload endpoint. Here's how you can do it:
curl -X POST http://localhost:9090/-/reloadHowever, this only works if you have run Prometheus with -web.enable-lifecycle option. If you followed this guide, we did not pass this option when configuring systemd service. You can modify the service file and add this line or also use the kill command like below.
First, find the process ID of Prometheus using the ps command:
ps -ef | grep prometheus
Then send kill command with -HUP options:
kill -HUP <prometheus_pid>In my case, the PID is 3538, therefore I executed:
kill -HUP 3538Step 4 - Check the Target Status
After adding a target to the Prometheus server, you can navigate to http://prometheus-server:9090/targets to see the list of targets Prometheus is collecting metrics from.
By now, we should have 2 targets and both of them should have a status of UP

If you see that the target is DOWN, you should troubleshoot the target and make sure Prometheus can access it to collect metrics. Check the firewall settings of the target and make sure it’s reachable from the Prometheus server.
What is Prometheus Alert Manager?
Alert Manager is a Prometheus component that facilitates sending alerts to different communications channels such as email, MS Teams, Slack, and so on.
It also allows you to group alerts, deduplicate them, and route them to different destinations.
For more information about Prometheus Alert Manager, check out the official documentation.
How to download and install Prometheus Alert Manager
In this guide, we will download the Alert Manager binary and run it as a service the same way we ran Prometheus and Node Exporter.
You can also build the binary yourself or use the Docker image. Read the GitHub repo README for more information.
Go to the download page of Prometheus and download the binary. I use cURL to download it on my Prometheus server. Make sure you download the binary based on your system architecture, mine is arm64.
Now download the Alert Manager binary:
curl -LO https://github.com/prometheus/alertmanager/releases/download/v0.26.0/alertmanager-0.26.0.linux-arm64.tar.gzLet’s make a new directory under /opt/ the same way we did for Prometheus and Node Exporter:
sudo mkdir /opt/alertmanagerExtract the contents of the Alertmanager archive we downloaded to this directory:
sudo tar -xzf alertmanager-*.tar.gz --strip-components=1 -C /opt/alertmanagerThe Alertmanager binary now should exist under /opt/alertmanager together with the alertmanager.yml, which is a sample configuration file, and amtool which is the command line tool for alertmanager:

To run the alertmanager, you can simply execute with:
./alertmanager --config.file=alertmanager.ymlHowever, we will run it as a systemd service so we can have more control over it, the same way we ran node_exporter and Prometheus itself.
How to run Alert Manager as a systemd service
Create a systemd file for alertmanager:
sudo touch /etc/systemd/system/alertmanager.serviceEdit the file with your favorite editor with the following content:
[Unit]
Description=Alert Manager
Wants=network-online.target
After=network-online.target

[Service]
User=prometheus
Group=prometheus
Type=simple
ExecStart=/opt/alertmanager/alertmanager\
  --config.file=/opt/alertmanager/alertmanager.yml \
  --storage.path=/opt/alertmanager/data

[Install]
WantedBy=multi-user.target
The --config.file specifies the configuration for the alertmanager and the --storage.path specifies a directory for storing alert manager data. If the directory does not exist, it will be created when the systemd service is started.
Reload the systemd daemon:
sudo systemctl daemon-reloadEnable the systemd service so it survives reboots:
sudo systemctl enable alertmanager
Start the alertmanger service:
sudo systemctl start alertmanager
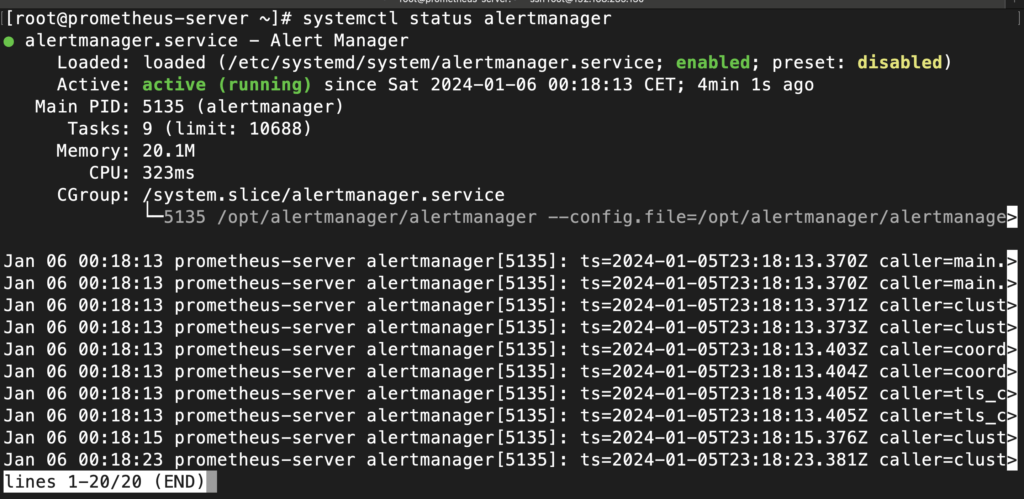
Check the service status:
sudo systemctl status alertmanager
It should be enabled and running:
If the service is not running, you can check the service status or use journalctl :
journalctl -u alertmanager --no-pager
Make sure you allow the Alert Manager port via your firewall to access its UI.
sudo firewall-cmd --permanent --add-port=9093/tcp
sudo firewall-cmd --reload
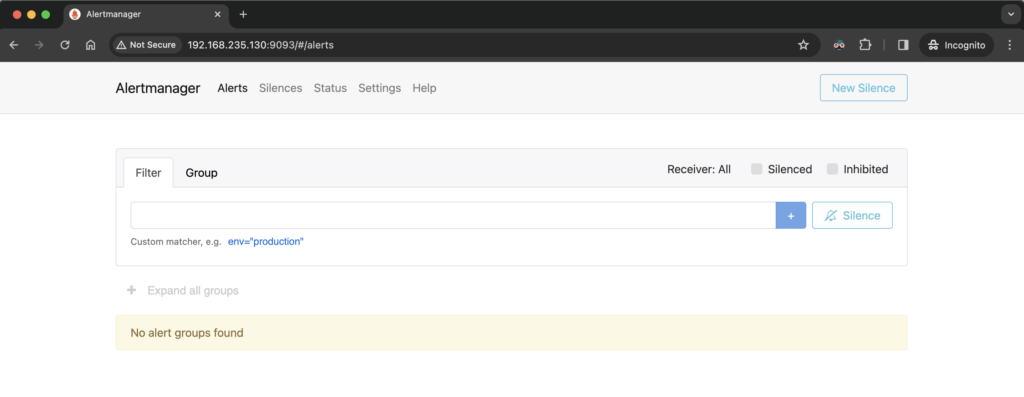
Open a browser tab and visit http://your-server:9093/
How to configure Alert Manager in Prometheus
The Prometheus configuration prometheus.yml can include a section for alerting rules. These rules dictate what alerts should be sent to the Alert Manager.
The following is the default configuration of Alert Manager (alertmanager.yml) that comes with the installation:
route:
  group_by: ['alertname']
  group_wait: 30s
  group_interval: 5m
  repeat_interval: 1h
  receiver: 'web.hook'
receivers:
  - name: 'web.hook'
    webhook_configs:
      - url: 'http://127.0.0.1:5001/'
inhibit_rules:
  - source_match:
      severity: 'critical'
    target_match:
      severity: 'warning'
    equal: ['alertname', 'dev', 'instance']
Let’s work with the default configuration file.
It consists of three sections:
Route Section
The route section in the Alertmanager configuration is the primary entry point for alert routing. It defines how alerts are passed down the routing tree. The key components of the route section include
- group_by: Specifies which labels should be used to group alerts. Alerts with the same label values are grouped.
- group_wait: The time to wait before sending the first notification for a group of alerts. This allows for accumulating multiple alerts into one notification.
- group_interval: Time to wait before sending a subsequent notification about the same group of alerts if they are still firing.
- repeat_interval: Time to wait before sending a notification again for an alert that has already been sent.
- receiver: The name of the receiver to use for alerts matching this route.
You can have nested routes that will give you more control over your routes. For example, you may have a different route for each environment dev, test, and prod. Nested routes look like the following:
route:
  # [route settings for the top-level route]
  routes:
    - match:
        instance: "dev"
      receiver: "dev-receiver"
The above-nested route configuration allows to send alerts with “instance=dev” to a separate receiver i.e. dev-receiver.
Receivers Section
The receivers section defines how notifications should be sent out when alerts are triggered. Each receiver has a name and configuration for one or more notification integrations like email, Slack, webhook, etc. Key components:
- name: A unique identifier for the receiver.
- email_configs, slack_configs, webhook_configs, etc.: Different types of configurations depending on the method of notification. Each type has its own set of required fields. For example,
webhook_configswould typically require aurlwhere the webhook payload is sent.
Inhibit Rules Section
The inhibit_rules section is used to suppress notifications for certain alerts if certain other alerts are already firing. This helps in reducing notification noise. Key components:
- source_match and target_match: Define the matches that identify the source and target alerts. For example, an inhibit rule might suppress sending notifications for all alerts with a severity of 'warning' (
target_match) if there is already an alert firing with a severity of 'critical' (source_match). - equal: A list of labels that must be equal between the source and target alerts for the inhibition to apply. This ensures that only related alerts are inhibited.
To explore more options, see https://prometheus.io/docs/alerting/latest/configuration/
Alerting Rules
Alerting rules are user-defined expressions that describe conditions under which an alert should be fired. These rules are evaluated at regular intervals, and if the conditions are met, an alert is generated and sent to the Alert Manager.
Rules are defined in Prometheus’s main configuration. You can point to a file or directory so Prometheus can evaluate those rules. It’s good practice to separate your rules into different files and not all in one file. For example, you could define your rules per service.
The syntax for specifying rules in prometheus.yml is as follows:
rule_files:
  - "alerts.yml"
  - "additional_rules/*.yml"
In our Prometheus configuration, we make a new directory inside our Prometheus directory and create all our rules there.
sudo mkdir /opt/prometheus/alertsNow we can point to this directory from our prometheus.yml file:
global:
  scrape_interval: 15s

scrape_configs:
  - job_name: "prometheus"

    static_configs:
      - targets: ["localhost:9090"]

  - job_name: "nodes"

    static_configs:
      - targets: ["localhost:9100"]

rule_files:
  - "/opt/prometheus/alerts/*.yml"
In the /opt/prometheus/alerts/ directory, let’s create a rule file for node exporters:
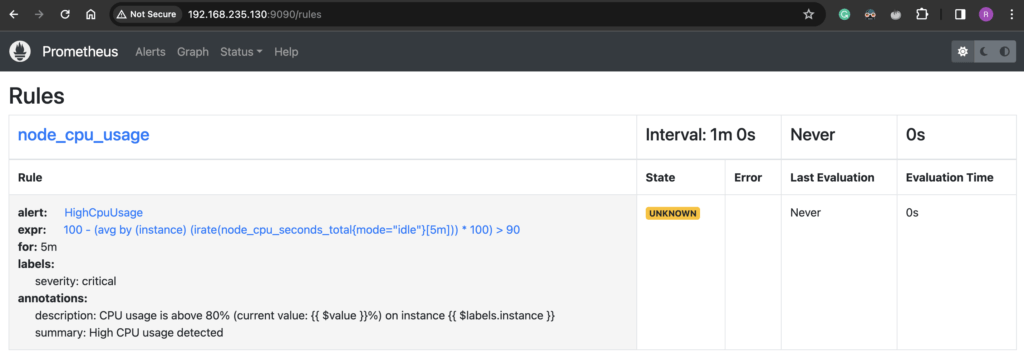
sudo touch /opt/prometheus/alerts/node_exporter.ymlLet's specify a rule in this file to alert the Prometheus alert manager when the CPU of a node goes beyond 90%.
groups:
- name: node_cpu_usage
  rules:
  - alert: HighCpuUsage
    expr: 100 - (avg by(instance) (irate(node_cpu_seconds_total{mode="idle"}[5m])) * 100) > 90
    for: 5m
    labels:
      severity: critical
    annotations:
      summary: High CPU usage detected
      description: "CPU usage is above 80% (current value: {{ $value }}%) on instance {{ $labels.instance }}"
To break down this rule configuration:
- groups:
- Prometheus alerting rules are grouped under
groups. Each group can have a name and contains multiple rules.
- Prometheus alerting rules are grouped under
- name: node_cpu_usage:
- This is the name of the group of rules. Here, it’s named
node_cpu_usageto indicate that the rules within this group are related to monitoring CPU usage.
- This is the name of the group of rules. Here, it’s named
- rules:
- This section contains individual rules.
- alert: HighCpuUsage:
- This line starts the definition of an alert named
HighCpuUsage. This name is arbitrary and should be descriptive of the alert's purpose.
- This line starts the definition of an alert named
- expr:
- The
exprfield is the expression that defines the condition for triggering the alert. 100 - (avg by(instance) (irate(node_cpu_seconds_total{mode="idle"}[5m])) * 100) > 80: This expression calculates the CPU utilization. It subtracts the average percentage of idle CPU time over the last 5 minutes from 100% to get the CPU usage percentage. If the result is greater than 90%, the alert is triggered.node_cpu_seconds_total{mode="idle"}: This metric comes fromnode_exporterand represents the total number of CPU seconds spent in the idle mode.irate(...): This function calculates the rate of increase of the metric in the specified time window ([5m]for 5 minutes).avg by(instance) (...): This averages the CPU usage across different instances (if you have multiple instances/hosts being monitored).
- The
- for:
- This specifies the duration for which the condition must be true before the alert is fired. Here, it's set to
5m, meaning the high CPU usage must persist for 5 minutes before the alert is triggered.
- This specifies the duration for which the condition must be true before the alert is fired. Here, it's set to
- labels:
- Labels are key-value pairs that add metadata to the alert. In this case, a label
severitywith the valuecriticalis added.
- Labels are key-value pairs that add metadata to the alert. In this case, a label
- annotations:
- Annotations provide additional information about an alert. They are not used for filtering or routing but can be very informative in notifications.
summary: A brief description of the alert.description: A more detailed description, which includes the current value of the CPU usage and the instance on which the high usage is detected. Prometheus templating (like{{ $value }}and{{ $labels.instance }}) is used to include dynamic content in the annotation.
Save this configuration and restart the Prometheus server and alertmanager:
sudo systemctl restart prometheus
sudo systemctl restart alertmanager
To see if the rule we added is properly configured and loaded, head over to http://prometheus-server:9090/rules, you should see the new rule listed there.
How to test Alert Manager
To verify the CPU high usage alert we configured is working, let’s put the server under pressure to see if the alert gets triggered.
To achieve this, we can install the stress utility on Linux. I’m using a RHEL system and I use yum to install this package:
sudo yum install stress-ng
Be sure that you are in a test server or environment.
My test server has 2 CPUs and I will stress them both using the following command:
stress-ng --cpu 2
Wait for CPU usage to spike and wait for the Alert Manager interval.
You can evaluate your alerting expression using PromQL to see if it has gone beyond the threshold.

In my case, the expression returns 100, which is beyond the 90% threshold we set in my alert configuration.
To view the alerts, click on the Alerts tab on the Prometheus UI.
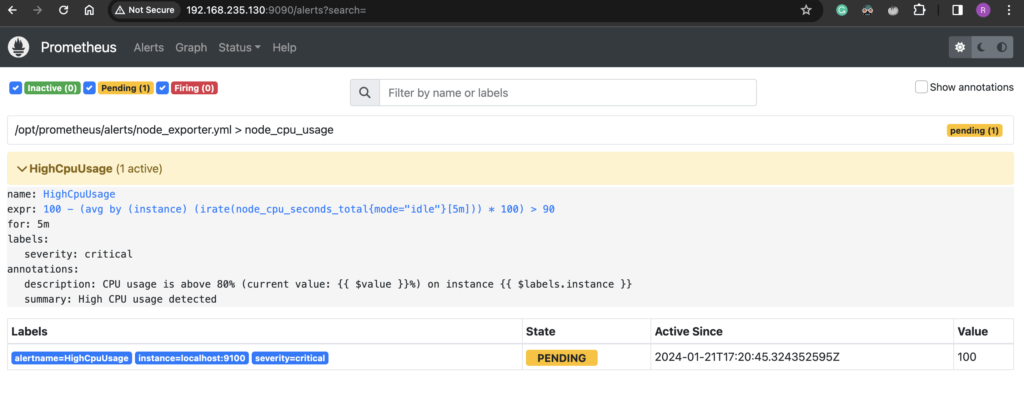
You should see the alert is in “Pending” status. The alert will stay in “Pending” for the duration specified in the alert configuration. In my case, this was set to 5 minutes and after 5 minutes it will go to “Firing” status.

We have successfully configured Alert Manager and alerting rules to get alerts when the CPU is higher than 90%.
Now let’s take a look at how we can get notified when such alerts are triggered.
You can also view the alerts directly on the Alert Manager UI http://your-server:9093/
Installing and Configuring Grafana
Grafana is a powerful open-source visualization tool that enables you to make sense of Prometheus metrics. Grafana is a standalone software and is not part of Prometheus but it’s a go-to technology for Prometheus when it comes to visualization.
You can use Grafana Cloud if you don’t want to manage it yourself. For this guide, we will download and install the self-managed Grafana software.
How to Install Grafana
To install Grafana on a RHEL-based system:
Import the GPG key.
curl -LO https://rpm.grafana.com/gpg.key
sudo rpm --import gpg.key
Create /etc/yum.repos.d/grafana.repo with the following content:
[grafana]
name=grafana
baseurl=https://rpm.grafana.com
repo_gpgcheck=1
enabled=1
gpgcheck=1
gpgkey=https://rpm.grafana.com/gpg.key
sslverify=1
sslcacert=/etc/pki/tls/certs/ca-bundle.crt
exclude=*beta*
Install Grafana
sudo yum install grafana -yHow to start Grafana
To start Grafana, simply run the following systemd commands:
sudo systemctl daemon-reload
sudo systemctl start grafana-server
sudo systemctl enable grafana-server
Check Grafana service status and make sure it’s running:
sudo systemctl status grafana-server
By default, Grafana runs on port 3000, make sure this port is allowed in the firewall.
sudo firewall-cmd --permanent --add-port=3000/tcp
Reload firewall:
sudo firewall-cmd --reload
This should be enough to allow you connect to Grafana UI.
Open a browser and visit http://your-server:3000 and you should be presented with a login
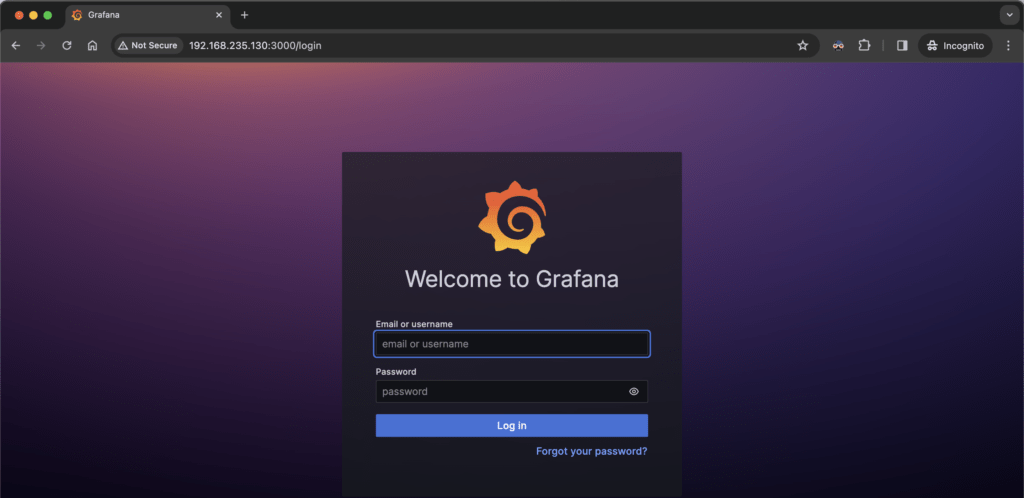
How to sign in to Grafana
Use the default “admin” username and password to log in. Simply type “admin” in both the username and password fields. it will prompt you to change your password.
How to add Prometheus as a data source to Grafana
To have access to all of Prometheus metrics and to visualize those metrics we should add Prometheus as a data source to Grafana.
To add Prometheus to Grafana:
- Click the hamburger icon on the top left on Grafana
- Go to Data Sources
- Under the “Connection” section, specify the Prometheus server URL:
http://your-prometheus-server:9090/
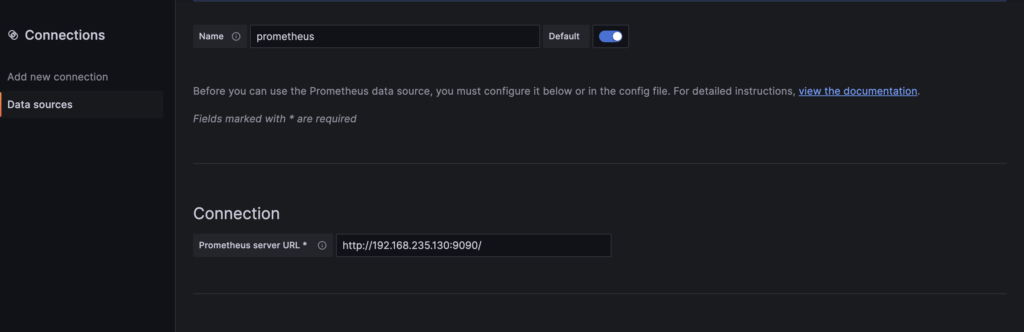
- Change other configurations if you need, I will leave them as they are for now.
- Click on “Save & test”. You should see a success message

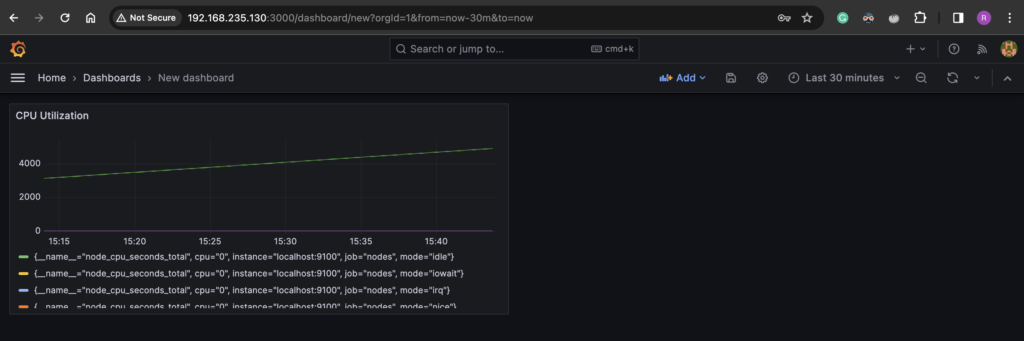
How to set up your first dashboard in Grafana
Let’s set up our first Grafana dashboard to monitor the CPU utilization of our Prometheus server.
To create a dashboard:
- Click on the top left hamburger icon and select “Dashboards”
- Click on “Create Dashboard” > “Add visualization”
- Select Prometheus data source
- Give the Panel a Title like “CPU Utilization”
- Add the bottom you will see “Query”. Here you can one or more PromQL query for the panel.
- Under Metric, search the
node_cpu_seconds_totalmetric that comes from Prometheus - Click on “Run query”.
- You will see the CPU utilization graph appear on the panel.
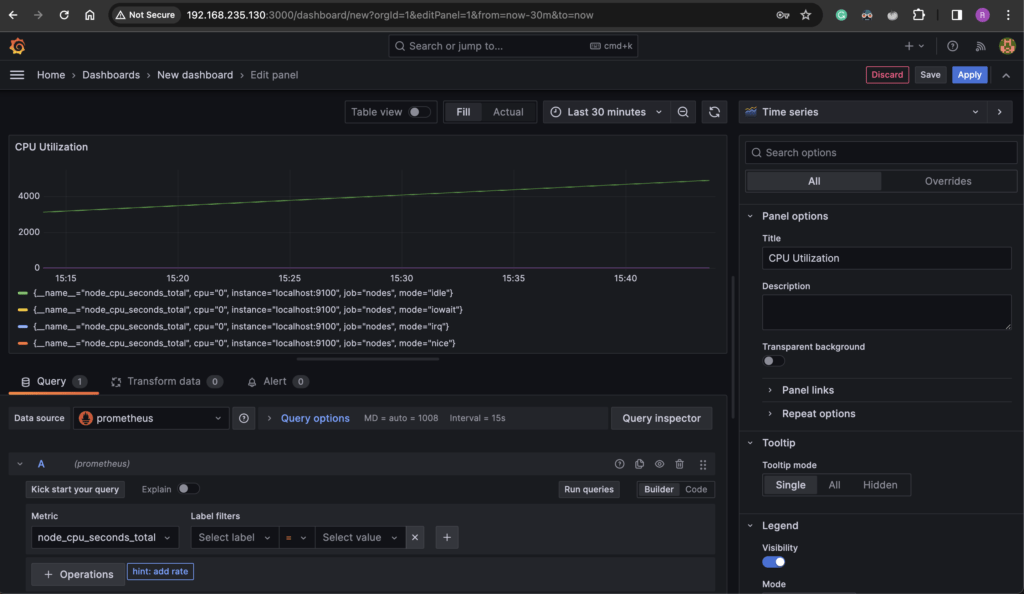
- Click “Apply” or “Save”.
There you have your first panel (CPU graph) in Grafana. You can more panels to this dashboard like memory utilization by clicking the “Add” ˜button on the dashboard.
Conclusion
Prometheus is a powerful monitoring system that can monitor static environments like virtual machines as well as dynamic environments like Kubernetes. It works well together with Prometheus Alert Manager to handle alertings and Grafana to visualize and make sense of the metrics. In this comprehensive guide, we learned about what Prometheus is, and how to install and configure Prometheus together with Alert Manager, Node Exporter, and Grafana.